


Artkal Bead Color Twist Cup | DIY Tutorial

I’ve been using Artkal beads for quite a few years now, long enough to amass quite a collection of just about every color that they make. I started out making flat projects like coasters and small wall decorations. But lately I have started trying to experiment on what I can do with these beads that’s thinking a bit more outside the box. So I came up with a Perler Twist Cup.
I’ve seen other crafters make storage boxes and other similar containers out of Artkal beads before. But they were always made of four flat sides and a base that were connected together. For mine, I used a bunch of layers stacked together to create the shape of my container. It takes quite a bit longer to make this one, not going to lie, but I think that it gives the project a cool texture and a neat look with the way the pattern twists around.
Before I begin, although I’m using the Artkal brand iron-able beads, I know there are a few other brands out there that I’m sure work just as well. Artkal is all I’ve ever used, though, so I don’t know how any of those other brands compare.
For this project, I’m using white, blue, yellow, and pink together to make what I’ve been calling “Marshmallow Twist” because it was inspired by the twisted marshmallow candies that often come in those colors. This is just one pattern, but you could do just about any color combinations you choose, as long as the pattern fits evenly around your outer circle (I’ll explain a bit more on how to figure that out in the tutorial).
What You Will Need for this Project
Note: This post may contain affiliate links, which means that if you click on a link and make a purchase, I may earn a small commission at no extra cost to you. For more information, please see my Disclosure.
Materials:
–Artkal Beads in the following colors:
- White
- Toothpaste
- Light Pink
- Pastel Yellow

Tools:
-Iron
– A few large books or other flat, heavy objects

The tweezers are optional, but I highly recommend them. It makes picking up and placing the beads SO much faster and easier. I also have a lot of problems with the beads sticking to my fingers from static electricity. The tweezers keep that problem from happening too. You can use any type of tweezers, but I prefer the Perler brand ones that have the long, thin ends.
How to Make a Perler Twist Cup
Step 1: Make the Base Layer
Although you could make your side layers first, I prefer to start with the base layer. Now you’ll need your circle template, which holds the beads in place so your layers will be as uniform as possible. I got the one I’m using from a set that includes several other template shapes. I’ve also found the same size template in the Artkal emoji kit, and as a bonus it includes extra beads and ironing paper too!
Before starting, you’ll need to decide how wide you want your container to be. My preferred size, which is the size I’m making here is eight rings out from the center. That means your outer ring (the one that will have your pattern on) is 48 beads total around. That means if you want to do a different pattern than what I’m showing here, as long as your repeating pattern divides into 48, it will work for this size.
For example, in my pattern I’m using 4 beads of each of my 4 colors, meaning my repeating pattern is 16 beads. 16 divides into 48 by exactly 3, so it works.
Once you’ve decided on what outer pattern you want, decide what your inner color is going to be. For this one I chose to do white, but you can pick any color that works with your pattern. Take some beads in your inner color and begin filling in your base layer, which will be the center peg, plus 7 more rings around.

When you have the base filled in, you can now add the outer ring. Here I’m doing 4 beads of white, then 4 beads of blue, then 4 beads of pink, and finally 4 beads of yellow. Then I repeat that pattern all the way around.

Make sure everything looks good and then you are ready to iron. I highly suggest you do your ironing on a hard flat surface like a table. From my experience, I did not have good results when my surface had any padding, like on an ironing board. I ended up with a lot of instances where the beads shifted off the board while ironing and messed up the spacing of the beads. It was just a big mess but I’ve never had any problems when I do my ironing flat on the table.
Place a sheet of Artkal ironing paper on top of your project and begin to iron. You will want your beads to melt enough that the beads all fuse together, but there should still be a hole in the middle.

When the back side is ironed, carefully pull off the ironing paper and quickly place your base layer between some heavy books or some other flat and heavy objects. This is very important because if you let the beads cool on their own, the shape will end up warping a bit, and that will make it very hard to glue all your layers together.

Step 2: Make a Side Layer
Now we can start on the side layers. This is going be exactly like the two outer rings of your base. Which means it will be your outside pattern and one inner ring.

The reason I did two rings instead of just the outside pattern is because it makes each layer a bit sturdier, especially when ironing. I’ve tried doing a single ring as well, and it’s much harder to keep the shape from warping once the beads are melted. Plus, it’s also much easier to glue all the layers together if you have a bit more working area to put the glue down.
Once you place all the beads onto your template, iron just as you did the base layer. Be a bit more careful pulling the ironing paper off, though, since you still run the risk of warping the shape if you’re not careful enough.

Then place the layers between some heavy books to cool.
Step 3: Keep Making Side Layers
Repeat Step 2 of making the side layers until you have 24 total side layers.

You may need to do these in batches depending on how many books you have to weigh your pieces down. I’ve never gotten an exact time for how long they need to completely cool, but I would give them at least 20 minutes.
Even if your pieces are cool to the touch, it doesn’t mean they are 100% cooled all the way through. I’ve had a few pieces that I thought were done, but ended up with very slight warping after a while. Try to let them cool for as long as you can.
Step 4: Glue All Layers of Perler Twist Cup Together
Now it’s time to glue. My top choice is hot glue because it sets almost immediately. But that also means hot glue isn’t as forgiving. So if you need more working time, I’m sure a multipurpose glue like E6000 would work as well.
Any hot glue gun should work fine for this. I have two different ones and tested both of them when putting this cup together. I used the one pictured in this tutorial when gluing the first layer to the base. It works just fine for an inexpensive glue gun, but is nothing special. I finished the rest of my layers with my Ryobi glue gun and it works AMAZINGLY. However, it’s a bit of an investment and I would only recommend it to those who already have a Ryobi battery to use with it. Otherwise, you’re looking at a very expensive glue gun.
Before you start gluing I’d suggest quickly lining all your layers up to make sure that none of them are upside down. Finding a mistake at this point is much easier to fix than if you find out after you’ve already glued the layer down.
As you can see in the picture below, you are going to glue your layers on top of one another, but each layer is going to be shifted one bead to the right.

Take your base and first layer and put a line of hot glue on the outer two rows of your base.

Line up your first circle so that the beads are lined up with the base, but shifted one bead to the right. Then press firmly together. Depending on how long it takes for the glue to dry you may need to hold it for a few seconds.

When that is set, continue with all the rest of your layers, each time shifting one bead to the right. This is what will end up creating the twist effect when it is all done.

Don’t worry too much about it being perfect. If you take a close look at my finished perler twist cup you can see that a few of my layers aren’t lined up 100% perfect. But you still see the color twist effect just fine.
Step 5: Fill Your Perler Twist Cup
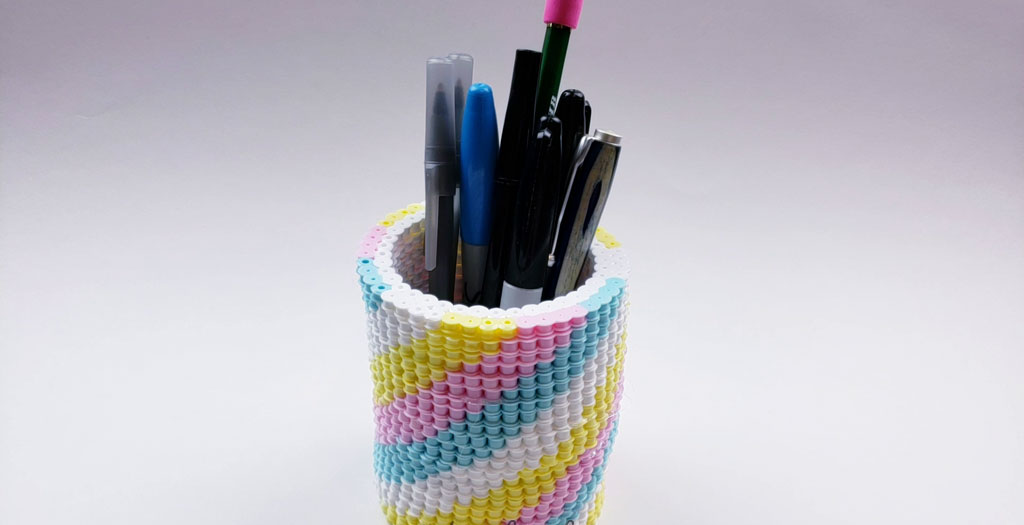
When all your layers have been glued on and are dry, you can fill your new perler twist cup with whatever you like. I created this one with pens/pencils in mind, but you can fill it whatever you want!

Artkal Twist Cup Color Variations
There are an unlimited amount of variations you can do on the perler twist cup to customize it however you want. Here are a few color variations that I came up with, along with lists of what colors I used.
I apologize that I only have one ring of each. I just didn’t have time to make a full container for each of these color combos. But I have plenty more ideas. So you may end up seeing these finished in future blog posts. Or I may update this one at a later date.
Mermaid

Colors Used:
Pastel Green
Light Pink
Pastel Lavender
Pink Ombre

Colors Used:
White
Light Pink
Bubblegum
Raspberry
Unicorn

Colors Used:
White
Light Pink
Apricot
Pastel Yellow
Prickly Pear
Toothpaste
Light Lavender
In addition to color variations, you can try using different circle diameters to make containers that are bigger or smaller. Or try using a different amount of layers to make them taller or shorter. You could also shift your layers to the left instead when gluing so your color twist goes in the opposite direction. Try all kinds of different combinations to make a perler twist cup that’s perfect for you!
I hope that you enjoyed this tutorial and found it helpful. If you have any questions or comments, please feel free to leave them below. I’d love to hear from you! Thank you for stopping by and happy crafting!