


Artkal Bead Earrings
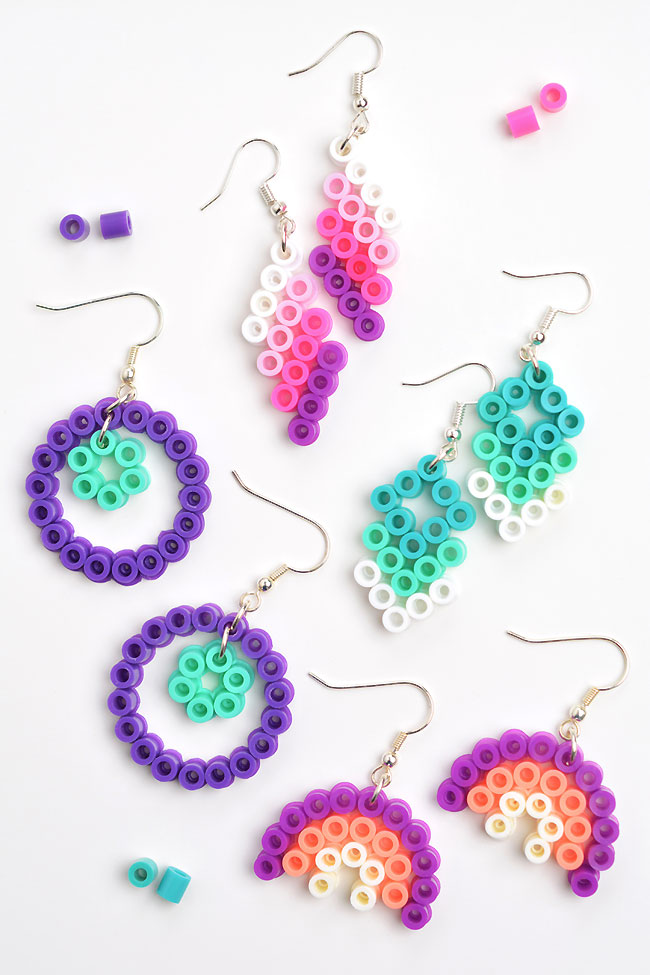
These Artkal bead earrings are so fun to make, and they look so cute!! Use your favourite colours of Artkal beads to make a pair of DIY earrings in less than 15 minutes.
Use our free Artkal bead earrings templates as inspiration, or design your own earrings! It’s such a cool craft that both kids and adults can enjoy, and it’s the perfect activity for a birthday party or sleepover.

This post contains affiliate links. If you use these links to buy something we may earn a small commission which helps us run this website.
How to Make Artkal Bead Earrings
These DIY Artkal bead earrings are SO CUTE and fun to make! Use our free templates and make your own pair of earrings in less than 15 minutes.
AUTHOR: Debbie Chapman
Materials:
- Artkal beads (MULTIPLE COLOURS)
- Artkal beads pegboard (SMALL SQUARE AND/OR CIRCLE)
- Metal jump rings
- Earring hooks
Equipment:
- Free Printable Artkal beads earrings template (more template options below)
- Tweezers (optional)
- Parchment paper
- Iron
- Needle nose pliers
Check Out The Video Tutorial:
Looking for fun bead craft ideas? Here’s a few of our favourites:
Artkal Bead Cats
Artkal Bead Flower
Instructions:
Step 1: Find what you need
- Gather your supplies and materials.

Step 2: Make the earring pattern
- For these earrings we’ll be using a round pegboard, which means you can only make one earring at a time.

- Optional: Use tweezers to add the Perler beads to the pegboard.
- Little fingers probably don’t need to do this, but it makes it a lot easier for adults!

- Add 6 Perler beads in a circle around the center of the board.

- Add a complimentary colour of Perler beads two rows away from the first circle. Continue adding beads until another circle is formed.These two circles will be attached later. Double check your design against the template.

Step 3: Iron the Perler beads
- Put the pegboard on an ironing board or a wood cutting board. Place a piece of parchment paper over top of the Perler bead design.Heat the iron to medium temperature, no steam. Place the iron on the parchment paper and move it around in circular motions for at least 15 – 20 seconds.

- Check the beads to see if they’re melted together. Continue to iron for another 10 – 20 seconds, if needed.The beads should be melted correctly when the parchment paper sticks to the beads and needs to be peeled away from them.

- Leave the melted Perler beads on the pegboard until they’ve cooled.Make and iron a second identical set of circles for the matching earring.

Step 4: Add the earring hardware
- Use needle nose pliers to open the jump ring.

- Attach the jump ring through one of the beads in the small circle. Don’t close the jump ring yet.

- Now add the same jump ring to a bead on the larger circle.This can be tricky to do, so open the jump ring wide and try using a second set of pliers to help get the jump ring attached and closed.

- Add a second jump ring through the same bead, coming out the other side.

- Place the earring hook onto this jump ring.

- Close the jump ring to secure the earring hook.Repeat, adding jump rings and a hook to the second earring.

- Your Perler bead earrings are complete!

Helpful Tips:
- You can only make 1 earring at a time on the round pegboard, so make sure you have enough beads to make a matching earring.
- If your earrings twist sideways when you put them in your ear, try adding an extra jump ring in between the Perler beads and the earring hook to help them sit more naturally.
- If you’ve melted the beads so much that the holes have closed up, use a large needle to open one of the holes back up again.

Download our free Perler bead earrings templates:
Click on the links below to download our free, printable Perler bead earrings templates! The PDF files will open in a new window.
Then simply follow along with the pattern on your device’s screen, or print the templates in colour on 8.5 x 11 (letter size) printer paper.
>>> Perler Bead Earrings Template # 1 <<<

What are Perler beads?
Perler beads are small, cylindrical plastic beads with a hole in them. They’re also known as “melty beads” or “fuse beads”.
Perler beads are meant to be melted together in different designs (like cat Perler beads!). Patterns are made on a plastic pegboard and then ironed so the beads stick together.
